Nissan Maxima Service and Repair Manual: How to erase permanent DTC
Description
OUTLINE
When a DTC is stored in ECM
When a DTC is stored in ECM and MIL is ON, a permanent DTC is erased with MIL shutoff if the same malfunction is not detected after performing the driving pattern for MIL shutoff three times in a raw.
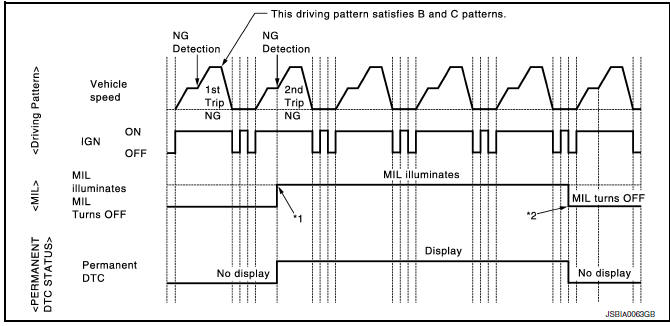
*1: When the same malfunction is detected
in two consecutive trips, MIL
will illuminate.
*2: MIL will turn off after vehicle is driven
3 times (driving pattern B) without
any malfunctions
When a DTC is not stored in ECM The erasing method depends on a permanent DTC stored in ECM. Refer to the following table. NOTE: If the applicable permanent DTC includes multiple groups, perform the procedure of Group B first. If the permanent DTC is not erased, perform the procedure of Group A.
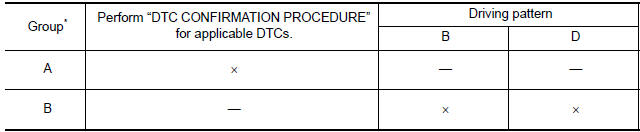
*: For group,
PERMANENT DTC ITEM
For permanent DTC items, MIL turns ON.
PERMANENT DTC SERVICE PROCEDURE
Work Procedure (Group A)
*1: When the same malfunction is detected in two consecutive trips, MIL will illuminate.
1.CHECK DTC
Check DTC.
2.CHECK PERMANENT DTC
With CONSULT
- Turn ignition switch OFF and wait at least 10 seconds.
- Turn ignition switch ON.
- Turn ignition switch OFF and wait at least 10 seconds.
- Turn ignition switch ON.
- Select "PERMANENT DTC STATUS" mode with CONSULT.
With GST
- Turn ignition switch OFF and wait at least 10 seconds.
- Turn ignition switch ON.
- Turn ignition switch OFF and wait at least 10 seconds.
- Turn ignition switch ON.
- Select Service $0A with GST
3.PERFORM DTC CONFIRMATION PROCEDURE
Perform "DTC CONFIRMATION PROCEDURE" for DTCs which are the same as permanent DTCs stored in ECM.
4.CHECK PERMANENT DTC
With CONSULT
- Turn ignition switch OFF and wait at least 10 seconds.
- Turn ignition switch ON.
- Turn ignition switch OFF and wait at least 10 seconds.
- Turn ignition switch ON.
- Select "PERMANENT DTC STATUS" mode with CONSULT.
With GST
- Turn ignition switch OFF and wait at least 10 seconds.
- Turn ignition switch ON.
- Turn ignition switch OFF and wait at least 10 seconds.
- Turn ignition switch ON.
- Select Service $0A with GST.
Work Procedure (Group B)

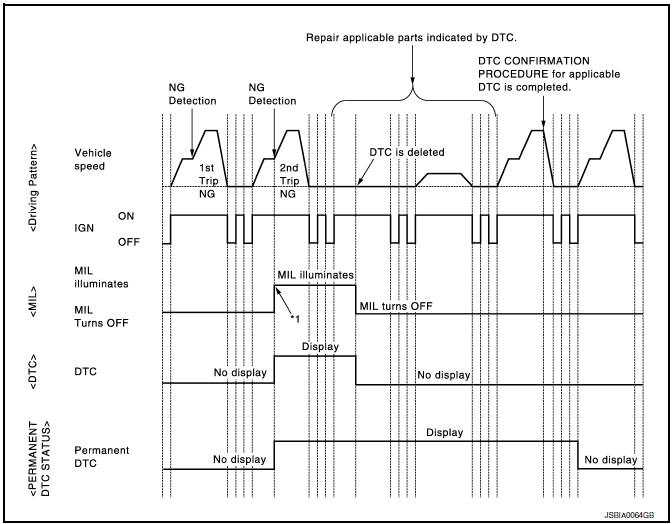
*1: When the same malfunction is detected
in two consecutive trips, MIL
will illuminate.
*2: After experiencing driving pattern B
and D, permanent DTC is erased.
*3: Indication does not change unless
the ignition switch is turned from ON
to OFF twice even after experiencing
driving pattern B or D.
NOTE: Drive the vehicle according to only driving patterns indicating "INCMP" in driving patterns B and D on the "PERMANENT DTC STATUS" screen.
1.CHECK DTC
Check DTC.
2.CHECK PERMANENT DTC
With CONSULT
- Turn ignition switch OFF and wait at least 10 seconds.
- Turn ignition switch ON.
- Turn ignition switch OFF and wait at least 10 seconds.
- Turn ignition switch ON.
- Select "PERMANENT DTC STATUS" mode with CONSULT.
With GST
- Turn ignition switch OFF and wait at least 10 seconds.
- Turn ignition switch ON.
- Turn ignition switch OFF and wait at least 10 seconds.
- Turn ignition switch ON.
- Select Service $0A with GST.
3.DRIVE DRIVING PATTERN B
CAUTION:
- Always drive at a safe speed.
- Never erase self-diagnosis results.
- If self-diagnosis results are erased during the trip of driving pattern B or D, the counter of driving pattern B and D is reset.
With CONSULT
- Start engine and warm it up to normal operating temperature.
- Use "PERMANENT DTC WORK SUPPORT" mode with CONSULT to drive the vehicle according to driving pattern B. Refer to EC-138, "CONSULT Function", EC-132, "DIAGNOSIS DESCRIPTION : Driving Pattern".
With GST
- Start engine and warm it up to normal operating temperature.
- Drive the vehicle according to driving pattern B. Refer to EC-132, "DIAGNOSIS DESCRIPTION : Driving Pattern".
4.CHECK PERMANENT DTC
With CONSULT
- Turn ignition switch OFF and wait at least 10 seconds.
- Turn ignition switch ON.
- Turn ignition switch OFF and wait at least 10 seconds.
- Turn ignition switch ON.
- Select "PERMANENT DTC STATUS" mode with CONSULT.
With GST
- Turn ignition switch OFF and wait at least 10 seconds.
- Turn ignition switch ON.
- Turn ignition switch OFF and wait at least 10 seconds.
- . Turn ignition switch ON.
- Select Service $0A with GST.
5.DRIVE DRIVING PATTERN D
CAUTION:
- Always drive at a safe speed.
- Never erase self-diagnosis results.
- If self-diagnosis results are erased during the trip of driving pattern B or D, the counter of driving pattern B and D is reset.
- Drive the vehicle according to driving pattern D. Refer to EC-132, "DIAGNOSIS DESCRIPTION : Driving Pattern".
6.CHECK PERMANENT DTC
With CONSULT
- Turn ignition switch OFF and wait at least 10 seconds.
- Turn ignition switch ON.
- Turn ignition switch OFF and wait at least 10 seconds.
- Turn ignition switch ON.
- Select "PERMANENT DTC STATUS" mode with CONSULT.
With GST
- Turn ignition switch OFF and wait at least 10 seconds.
- Turn ignition switch ON.
- Turn ignition switch OFF and wait at least 10 seconds.
- Turn ignition switch ON.
- Select Service $0A with GST.
 How to set srt code
Description
OUTLINE
In order to set all SRTs, the self-diagnoses as in the "SRT ITEM" table must
have been performed at least
once. Each diagnosis may require actual driving for a long period of ...
 System description
ENGINE CONTROL SYSTEM
System Diagram
System Description
ECM performs various controls such as fuel injection control and ignition
timing control.
Component Parts Location
Intake valv ...
Other materials:
B2110 transmission range switch
Description
IPDM E/R confirms the shift position with the following
signals.
Transmission range switch
Shift position signal from BCM (CAN)
DTC Logic
DTC DETECTION LOGIC
NOTE:
If DTC B2110 is displayed with DTC
U1000, first perform the trouble diagnosi ...
Rear door speaker
Removal and Installation
REMOVAL
Remove the rear door finisher. Refer to INT-21, "Removal and
Installation".
Remove the rear door speaker screws (A).
Disconnect the harness connector (B) from the rear door speaker
(1) and remove.
INSTALLATION
Installation is in the reverse orde ...
Intelligent key system/engine start function symptoms
Symptom Table
Engine cannot be started with all Intelligent Keys.
CAUTION:
Follow Trouble Diagnosis Flowchart
referring to "SEC-4, "Work Flow"". Determine malfunctioning
condition before performing this diagnosis.
Check that vehicle is under the
condition shown in "Conditio ...
Nissan Maxima Owners Manual
- Illustrated table of contents
- Safety-Seats, seat belts and supplemental restraint system
- Instruments and controls
- Pre-driving checks and adjustments
- Monitor, climate, audio, phone and voice recognition systems
- Starting and driving
- In case of emergency
- Appearance and care
- Do-it-yourself
- Maintenance and schedules
- Technical and consumer information
Nissan Maxima Service and Repair Manual

0.0059